Email inboxes are noisy–and are even more competitive than you might think. The average email user has an inbox made up of about 50% newsletters and 20% social network updates according to Microsoft.
So when a you’re working to stand out from the raucous crowd that’s competing for a user’s attention within the inbox environment, it’s no longer enough to send one-size-fits-all email messages—you need the one-two punch of sending the right personalized message at the right time.
That means harnessing the power of two different features within email: Personalization and automation. Here are some practical tips for getting started.
Personalizing Email Messages
Many businesses and organizations have fallen into the habit of sending mass emails that don’t utilize personalization (like including the recipient’s first name in the subject line.)
But Experian recently reported that implementing this minor change had a dramatic effect on open rates:
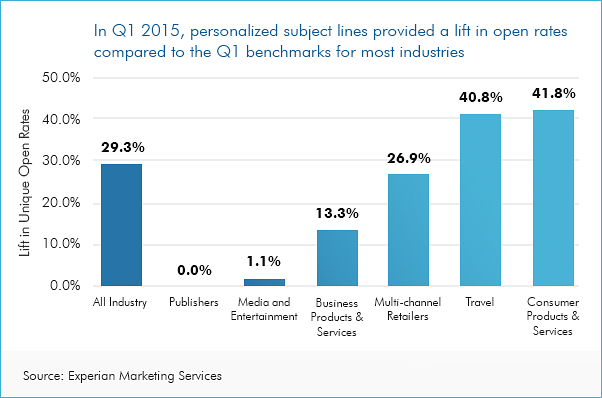
Across almost every industry studied, including the recipient’s name in the email subject line increased open rates–some by as much as 42%. Other research echoed the success of using a recipient’s first name in the subject line, reporting that emails with personalized subject lines are 26% more likely to be opened.
The shocking part is that researchers also found only 35% of marketers are leveraging personalized subject lines.
So, what gives? Is personalizing a subject line confusing? It’s actually pretty simple. As long as you’ve collected a first name from those who opt-in to your email list, personalization takes seconds. Most email providers (like Campaign Monitor,MailChimp, AWeber, etc.) enable you to insert a recipient’s first name by inserting a custom field into the subject line.
For example: If you were using Campaign Monitor and wanted to personalize your subject line, you’d use [firstname, fallback=] as pictured below:

And that’s it. With this simple step, every email recipient will see his/her name appear within the subject line, like in this example from Ipsy:

You can also use this same format to include the recipient’s first name within the message body, which ups the personalization just a little bit more, as seen in this email from Poshmark:

By simply enabling an existing feature on your email platform, you can boost open rates–which is the first step toward increased conversions.
Personalization via Segmentation
The realm of email personalization extends beyond the subject line, too. Aside from having a human element, personalized messages are also highly relevant for recipients–which is a major pain point for about three-fourths of email account owners. Research shows that as many as 74% of online consumers are frustrated by messages that aren’t relevant and don’t fit their interests, which can happen as a side effect of unsegmented email lists that help categorize subscribers.
Along with relevancy, segmented lists also have a slew of other positive effects for email marketing. The DMA reported that segmented at targeted emails generate 58% of all revenue, and that some markets have noted a 760% increase in revenue from segmented campaigns.
And then there’s data from the Lyris Annual Email Optimizer Report:
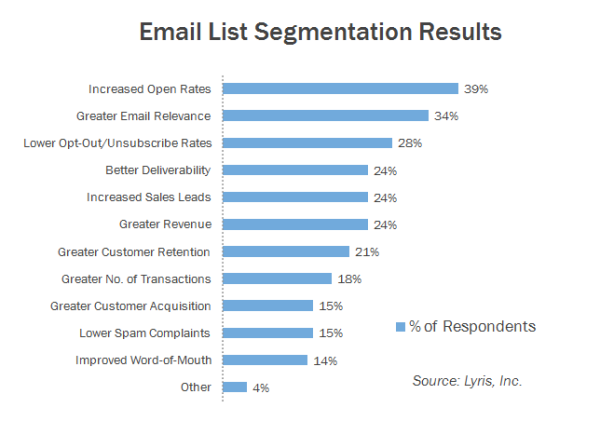
The report shows that segmentation also helps boost open rates, drives conversions, and overall increases the quality of communication–making for successful emails that feel tailor-made for each unique recipient.
So how do you go about segmenting your lists?
Step 1: Make a Plan for Segmentation
Every business has different objectives for their email marketing campaigns, but think about the ways in which you currently use email messaging, and how you’d ideally like to use it in the future. From here, you can start to break down a mass list into smaller, more relevant lists and map out your plan for segmentation.
Think about sorting contacts by:
- Demographics (gender, age, job title, geographic location)
- Purchase type (specific product categories)
- General interests (user-indicated topical interests, like special events)
These are just a few ideas to get your mental wheels turning, but think about how you can break down an existing list into more specific categories. Moving forward, you can then enable user-selected sorting capabilities (like the ability to opt-in to different segments of your list for specific types of communication.)
Need more inspiration? See how BuzzFeed uses email segmentation.
Step 2: Build Segments
Next, it’s time to start segmenting your list within your email platform. Some email platforms (again, we’ll use Campaign Monitor as an example) will allow you to build segments based on rules and parameters you set.
Here’s what it looks like to build different segments on their platform:
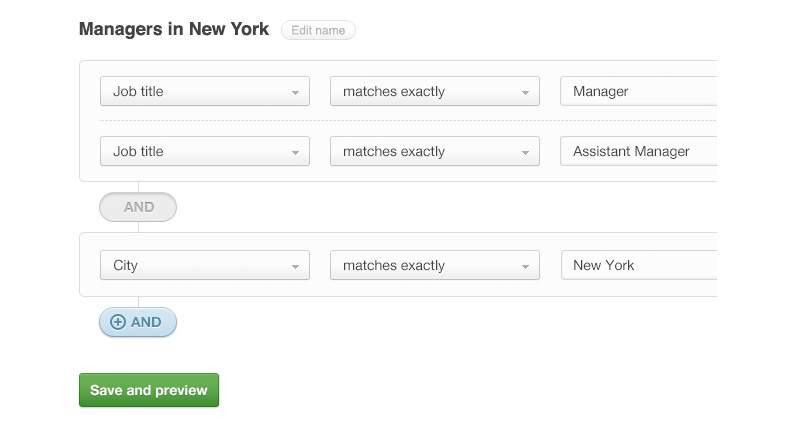
In the example, you can see how you could build out a specific segment that includes managers in New York via parameters that require the title of Manager or Assistant Manage who reside/work in New York.
You can create as few or as many different segments as you like, but each new segment should have a conversion-oriented purpose.
Note: If you want to create detailed segments, you’ll need to collect more detailed information from subscribers during opt-in. Add a few extra fields (like job title, address, etc.) that go beyond name and email address to get the data you need in order to properly segment.
Step 3: Send Accordingly
Once you’ve created your various segments, you can begin launching more specific email campaigns that align with the interests of your various lists.
Here’s an example of what that might look like: Imagine you own a retail business that specializes in outdoor sporting equipment. Rather than sending one-size-fits all emails that promote all of your products to a single list, you create segments based around promoting specific types of equipment (like fishing gear, baseball equipment, etc.)
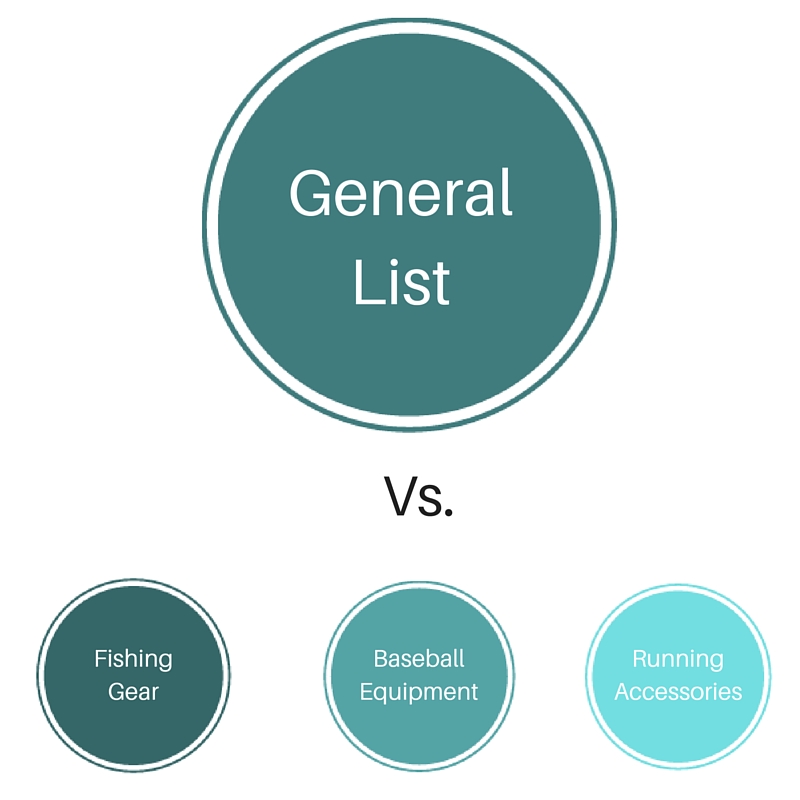
Through website opt-ins and online purchase tracking, you can now send highly relevant information about your specific products to people who’ve are most likely to be interested in that information.
Now that you know how to leverage personalization and segmentation to send the right message to the right email subscribers, let’s look at how you can use automation to send those messages at exactly the right times.
Automating Email Messages
Automated emails enable you to communicate with the right person with the right message at the right time (without having to keep track of each subscriber one by one.)
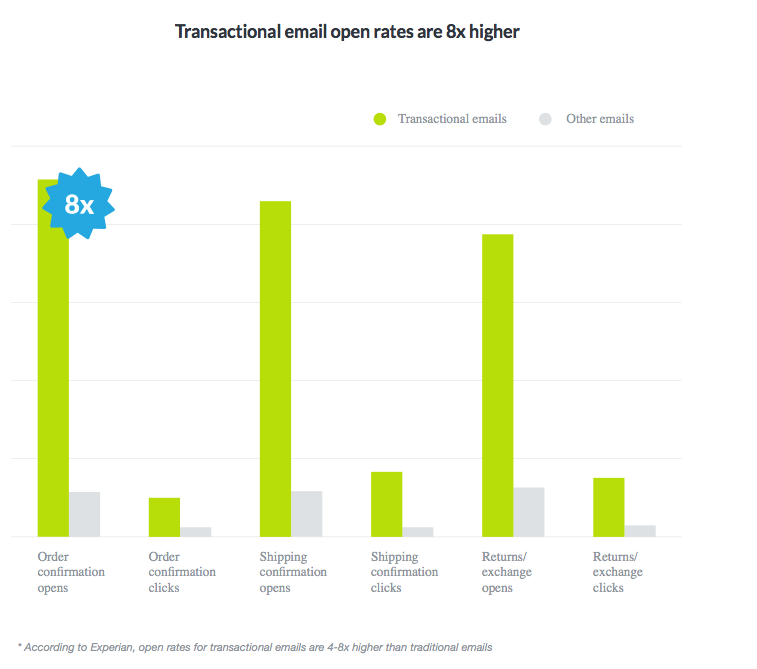
And they’re proven to be successful tools for boosting conversions, too. Experian research found that automated transactional emails have 8x more opens and clicks than any other type of email–and they can generate 6x more revenue. And along with the pure convenience factor it offers, email automation is proven to drive conversion rates by as much as 50% for B2C marketers.
Because of this, more and more companies are hopping on board with automation: it’s used by 82% of B2B and B2C companies, and revenue for marketing automation systems increased by 60% in 2014.
So how can you use email automation?
Many email marketing platforms already have automation features built in (although more often than not, they’re a paid feature.)
Automated emails can:
- Act as workflows that auto-send on a schedule (like after a customer makes a purchase)
- Auto-send when certain actions have been completed by a user or at a designated point in time (like when a user hasn’t made a purchase in 30 days)
- Act as an onboarding series (for use with new customers or new team members)
You can have multiple workflows running at the same time, so think about what different objectives you can accomplish within different series.
How to Set Up Email Automation
You can set up email automation for a variety of purposes, but let’s look at what it would look like using MailChimp:
Step 1: Choose Your Trigger
Using MailChimp, you can set up a workflow that triggers based on an action you select. In this example, the workflow is triggered when someone subscribes to a specific email list, but other triggers might be:
- When a customer celebrates his/her one-year anniversary of a subscription service
- When a purchase is made
- When a customer hasn’t visited the website within X days
From there, you’ll launch an email sequence that drives the recipient through a series of emails that all work together toward a conversion (like an item purchase.)
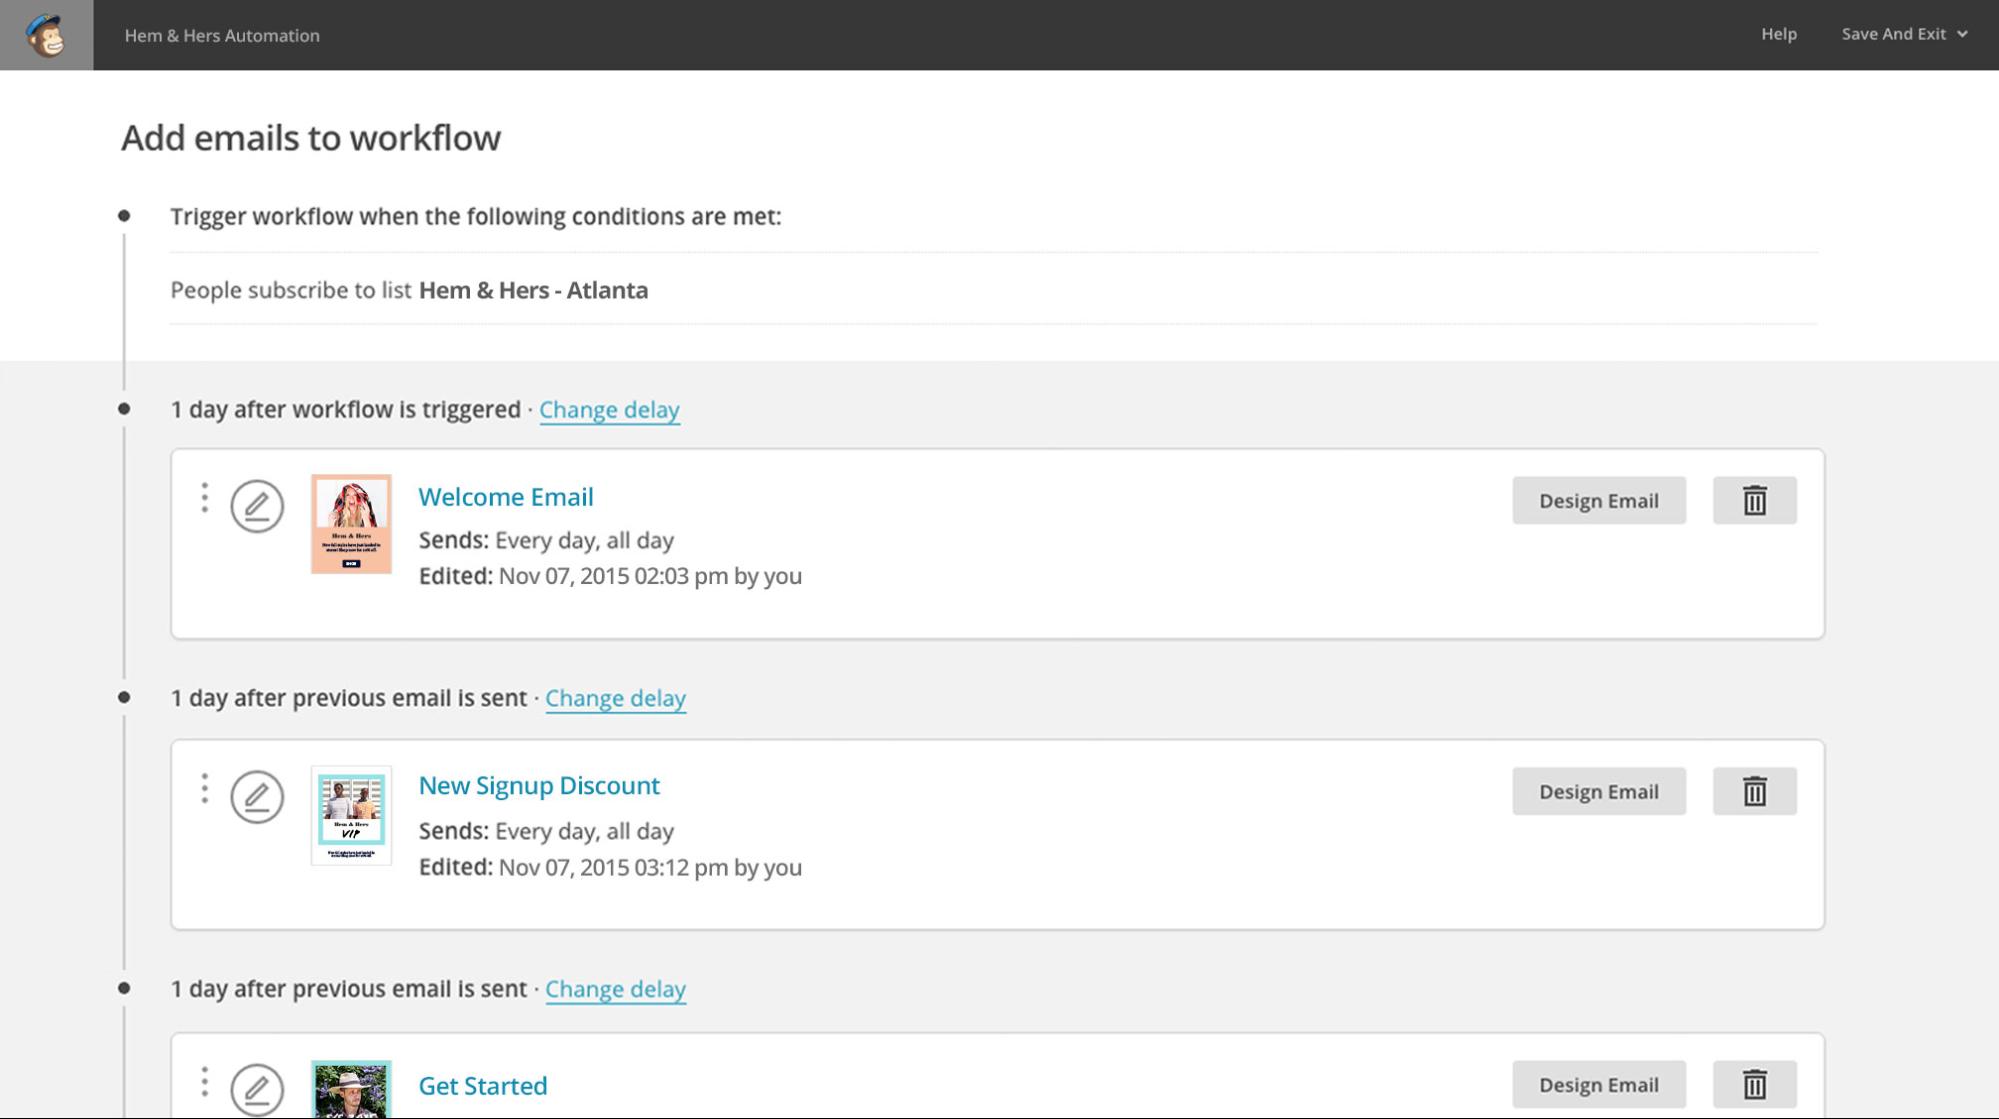
Step 2: Create Your Email Workflow
Next, put together a series of 3-8 (or more, if you want) that keep the conversation with your subscriber going. In the example, you’ll see that in the example, they’ve created:
- A welcome email
- A new signup discount email
- A getting started email
All of these messages help you stay in touch with the customer while encouraging them to take further action or to re-engage with you.
In your workflow, you can do things like:
- Showcase other offerings your business has
- Offer a discount or coupon code to encourage repeat purchases
- Highlight helpful resources, like how-tos or interesting blog content
- Leverage visual assets, like a lookbook or video
The goal of these on-going message series is for you to keep reminding your customer of the value you can provide and to keep your brand top-of-mind–so think about what you need to say to accomplish that.
Need more on this part? Read more on outbound email automation tactics here.
Step 3: Schedule Your Timing
Once your email series is ready, you’ll want to map out when these messages will send, and which recipients will receive them. Space out your messages so that they are not overwhelming, but on a timetable that maintains relevancy.

In the example, you’ll see how MailChimp lets you determine when automated messages will send and which segments will receive messages. You’ll want to test different send times to see which pattern is most effective for your audience.
Step 4: Don’t Forget Transactional Emails
Emails that send automatically after a customer completes an action are also part of your automated email strategy–so make sure you are optimizing them with clever copy and smart design. Studies show that messages about order confirmation and shipping confirmation have some of the highest open rates of all.
Many of these types of messages only include a standard message with order details, but with such high open rates, you should put these automated messages to work, too.
One of the beloved examples of a solid transactional email is this shipping confirmation email from CDBaby, which says:
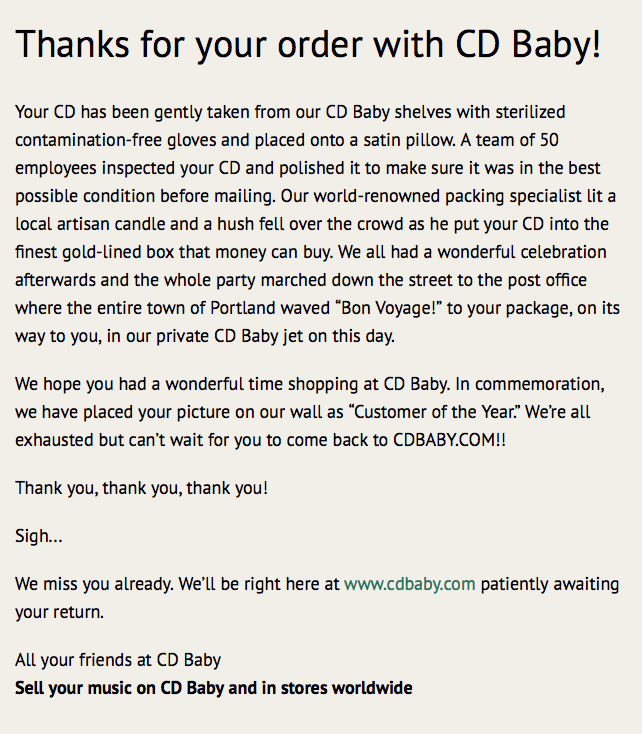
See how fun that is? Rather than just saying, “Thanks for your order” this email puts an interesting, lovable spin on what might be an otherwise boring message. Write copy that makes your message memorable for readers.
Step 5: Watch Conversion Rates Soar
Once your workflows go live, keep an eye on metrics like open rate and click-through rate to see how effective your automated campaigns are–and monitor how your conversion rate improves.
Just remember: Automation doesn’t mean set-it-and-forget it. You need to constantly make tweaks and improve based on subscriber feedback and A/B testing–just like with any other email you’d send.
Tools for Execution
The final question in this equation, then, is: What email platforms can I use to harness the power of both personalization and automation? Here’s a brief summary of a few options–but there are many, many more you can look into as well.
Campaign Monitor
This platform has a whole gallery of mobile-friendly templates you can customize, as well as lots of helpful resources for all aspects of email marketing. Thanks to built-in metrics and multiple integrations, you can study campaign success and make email marketing a seamless part of your operation.
This platform has a whole gallery of mobile-friendly templates you can customize, as well as lots of helpful resources for all aspects of email marketing. Thanks to built-in metrics and multiple integrations, you can study campaign success and make email marketing a seamless part of your operation.
Price: $9-49/month
Hubspot
Hubspot offers a full-service solution for marketers with everything from email, to CRM, to social media management, and more. If you’re looking for a one-stop-shop for all of your online marketing efforts, this is powerful option with a training system built right in.
Hubspot offers a full-service solution for marketers with everything from email, to CRM, to social media management, and more. If you’re looking for a one-stop-shop for all of your online marketing efforts, this is powerful option with a training system built right in.
Price: $200-2,400/month
MailChimp
Using MailChimp, you can take full advantage of a variety of different email tools, like A/B testing, automation, and more. Create custom templates or use their free options to build and send customized emails. Here you’ll find lots of teaching resources, helpful integrations, mobile-friendly designs, and advanced metrics for studying the success of your campaigns.
Using MailChimp, you can take full advantage of a variety of different email tools, like A/B testing, automation, and more. Create custom templates or use their free options to build and send customized emails. Here you’ll find lots of teaching resources, helpful integrations, mobile-friendly designs, and advanced metrics for studying the success of your campaigns.
Price: $25 and up, based on number of subscribers
AWeber
AWeber prides itself on its integration with other apps, its suite of advanced tools, and self-hosted opt-in forms. Again, tons of free guides to help you get started and webinars that enable you to get the most out of this platform.
AWeber prides itself on its integration with other apps, its suite of advanced tools, and self-hosted opt-in forms. Again, tons of free guides to help you get started and webinars that enable you to get the most out of this platform.
Price: $19 and up, based on number of subscribers
Constant Contact
One of the long-standing figures in the email marketing industry, this platform touts ease of use. Here, you can take advantage of templates, learn how to improve email marketing efforts, and get access to 24/7 support.
One of the long-standing figures in the email marketing industry, this platform touts ease of use. Here, you can take advantage of templates, learn how to improve email marketing efforts, and get access to 24/7 support.
Price: $20 and up, based on number of subscribers
Again, these five options are just the tip of the iceberg when it comes to your options for sending email, so look around and see which interface and tools best fit your needs. The bottom line is that you need to find an email marketing service that works with your budget and covers all of your needs for both personalization and automation.
Personalization + Automation = More Conversions
The numbers don’t lie–a combination of personalized email marketing and automated messaging are a surefire way for you to increase the success of your campaigns. Follow the steps for personalizing email, segment your lists, and put automated and triggered emails to work for your business.
To view the original article Click Here
No comments:
Post a Comment